I was wrong and it feels good

So I’m putting the finishing touches on an UberCart 2 module, and I’m thinking it’s as good as it’s going to get. Then I go ahead and test it—the most visible test would be the creation of a custom node type and product class—and… no go. The class is created, but the node type isn’t.

So I’m putting the finishing touches on an UberCart 2 module, and I’m thinking it’s as good as it’s going to get. Then I go ahead and test it—the most visible test would be the creation of a custom node type and product class—and… no go. The class is created, but the node type isn’t.

After a bit of googling, I realised I’d been doing it the wrong way. My code just had straight db_query‘s to insert the records in {node_type} and {uc_product_classes}. Well, the latter may have been okay, but the former totally wasn’t. db_query does execute correctly, but at some later point the node_type is deleted. Unfortunately I can’t find the particular page that told me this anymore.

Using node_type_save() won’t help, either, since that just calls INSERT or UPDATE commands.

I’ve got options, though. Implementing hook_node_info() and hook_form(), for one, as detailed here. This means I don’t have the option of leaving the node type in the system until the module is uninstalled; also, it still doesn’t answer the question of creating a corresponding product class. I tried adding code to my hook_node_type() implementation to insert the class, but that just had the effect of not creating the node type while creating the product class. Weird.

Still, I’m feeling very positive. This isn’t the first bump I’ve encountered on my Drupal learning curve. Won’t be the last, either, as just today I started porting this module to UberCart 3 / Drupal 7. About time, too, I’ve been itching to dig into D7!

Magento: Adding custom attributes to orders

I’m currently working on a little Magento side project. The learning curve is still steep, and still frustrating. A big part of it involves creating custom fields on orders.

I’m currently working on a little Magento side project. The learning curve is still steep, and still frustrating. A key part of it involves creating custom fields on orders.

Better Magento developers than me have already gone this route, so I didn’t need to reinvent the wheel. Alan Storm’s excellent post on setup resources was a huge help. I’ll just note a couple of things: first, the actual setup class name could in fact be anything, it doesn’t have to follow the Company_Module_Model_Mysql4_Setup pattern. All you need is to place it in the location in your directory that corresponds to the class name (as with all Magento classes).

Second, it bears repeating: the installer script will only run if the version stored in the core_resource table is different from the version being installed. To run the installer multiple times, simply delete the appropriate record from core_resource, then clear the cache (if it’s enabled) and refresh any page. Having only written one other extension with an installer script in my career, I’d forgotten that particular bit.

Third, and this also bears repeating: damn, but Magento is not friendly to developers. Usual Magento bitching aside (convoluted config.xml, overcomplex extension class/directory structure), why is it making developers do extra work, like writing:

$installer = $this;
$installer->startSetup();
...
$installer->endSetup();

…in every installer script? It’s just a little thing, you say? Maybe, but it’s one of many unnecessary little things, one more little annoyance for experienced developers, one more thing novice devs need to remember, making the learning curve just a little bit steeper.

So that’s general instructions for the installer. Now, how do I specifically add this custom field? I got my answer from the first post on this page. The logic goes like this:

$setup = new Mage_Eav_Model_Entity_Setup('core_setup');
$setup->addAttribute('order', 'newfield', array(
    'position'             => 1,
    'type'              => 'text',
    'label'                => 'Your New Field',
    'global'            => 1,
    'visible'           => 1,
    'required'          => 0,
    'user_defined'      => 1,
    'searchable'        => 0,
    'filterable'        => 0,
    'comparable'        => 0,
    'visible_on_front'  => 1,
    'visible_in_advanced_search' => 0,
    'unique'            => 0,
    'is_configurable'   => 0,
    'position'          => 1,
));            

Pretty self-explanatory, right? Note, though, one thing that tripped me up before I found the above link: the first argument of addAttribute() is a string, not an integer. I’d expected to have to enter the entity_type_id corresponding to orders (5, in my system), but no, it looks like it needs the entity_type_code (‘order’). Weird, and against my common sense.

So there you go, now you know how add custom fields to orders.

PS: here’s some more Magento bitching. This whole EAV scheme, what exactly is it good for? Because frankly, so far it’s given me nothing but headaches. It makes the db bloated and slow, makes looking up data extremely time-consuming, and does not make my life as a developer easier. Like, at all. Other e-commerce platforms (*coughUbercartcough*) use simpler and saner systems that are just as flexible, if not more so.

PPS: While playing around with this extension, I discovered some weird / amusing behaviour related to installing & uninstalling extensions. Since this has nothing to do with custom attributes or installer scripts per se, I’m saving it for another post.

Adding custom fields to orders in Ubercart

Here’s a little something I figured out just recently. Let’s say you have Ubercart installed. Let’s say also that you want to add a custom field to the uc_orders table. There are a couple of ways to do this.

Here’s a little something I figured out just recently. Let’s say you have Ubercart installed. Let’s say also that you want to add a custom field to the uc_orders table. There are a couple of ways to do this.

One is to hack the uc_orders.install file’ and add the field to its schema definition. That seems untidy, and of course not upgrade-safe. Not to mention it won’t work if Ubercart is already installed. Wouldn’t you need to uninstall/disable uc_orders, drop the orders table, then reinstall it with the new scheme?

THere’s a better way, though. What I’ve done is write a separate module. Call it “mymodule,” just for originality. In mymodule.install, use db_add_field() like so:

mymodule_enable() {
  $ret = array();
  db_add_field($ret, 'uc_orders', 'newfield', array(
    'type'=>'varchar', 
    'length'=>50)
  );
}

Simple! So now I’ve added a field to the database. Calling uc_order_load() works fine: the new fields are part of the order object since it just reads from the orders table; however, calling uc_order_save() will not update the new field.

There’s one more thing I needed to do. uc_order_save() calls drupal_write_record(), which depends on the schema. So mymodule needs to add its new field to the schema, using hook_schema_alter():

So what you do is write the following in mymodule.module:

mymodule_schema_alter(&$schema) {
  $schema['uc_orders']['fields']['newfield'] = array(
    'type' => 'varchar',
    'length' => 50,
    'description' => 'custom field',
  );
}

And it works! I’m wondering if I could put this code in the .install file instead, in mymodule_schema(). Would that work? None of the documentation I’ve read says anything pro or con.

Looking Back at 2011

Not a big list this time, I’ll just mention two memorable highlights of 2011: I started working with Drupal, and I turned 40.

Not a big list this time, I’ll just mention two memorable highlights of 2011: I started working with Drupal, and I turned 40.

Drupal

Since October 2010 I’ve been in a long-term contract as a developer with a small web shop, building e-commerce sites. After a few months working in Magento I started on a Drupal project (specifically Ubercart), and instantly fell in love. Most of the work I’ve done in 2011 has been in Drupal, mostly back-end coding around Ubercart, though there’s been some digging into core code, as well as front-end / theme development here and there.

In the last year or so I’ve gained tons of experience in Drupal—as well as WordPress in a few smaller projects, both paid and volunteer. Working with both systems has been extremely enjoyable, and I feel I’ve finally found my niche. I know it’ll open many doors for me.

The Big 4-0

I admit, I used to be antsy about turning 40, but when it actually happened, I felt just fine. 40 is just a number, right? Plus, what with volleyball, Taiji, cardio and weights, I’m in way better shape at 40 than at 30—or, hell, even at 39. Finally, everyone The other part is everybody telling me I look way younger than 40. The general consensus is early-thirtyish, though I did have one friend ask me if I was 26 when I mentioned my birthday. And I was all o_O. Just goes to show: 40 is the new 30.

VGVA.com redesign: the frontend

Layout-wise, I made a few changes to VGVA.com. First, a much wider default width (from 800 to 1024 pixels) allowed me a second sidebar. After a lot of experimentation and feedback from the VGVA board, I displayed our sponsors in two cycling blocks (thank you, jQuery Cycle Plugin!), plus a separate block for new “official supplier sponsor” volleyballstuff.net. Team sponsors should be pleased, at least; their logos had previously been stuck below the footer.

(Part 2 of my recap of the VGVA.com redesign. Part 1 is here)

Layout-wise, I made a few changes to VGVA.com. First, a much wider default width (from 800 to 1024 pixels) allowed me a second sidebar. After a lot of experimentation and feedback from the VGVA board, I displayed our sponsors in two cycling blocks (thank you, jQuery Cycle Plugin!), plus a separate block for new “official supplier sponsor” volleyballstuff.net. Team sponsors should be pleased, at least; their logos had previously been stuck below the footer.

The left sidebar displays news and matchmaker listings, two things previously confined to a couple pages each, as well as section sub-menus where appropriate, for easier navigation. Speaking of News, I decided to scrap the news archive page from the previous design. I’d gotten the idea from the Out on Screen site, but after a while archiving past events felt pretty useless (especially since almost all these events recur every year). I don’t have the numbers to back up my guts, but it makes for a simpler architecture and nobody’s complained yet, so there you are.

The matchmaker section hasn’t changed much, as far as the user would tell, except I did implement an AJAX-based login/signup process (which falls back to plain synchronous forms if the browser isn’t running JavaScript).

Lastly, I tried my hand at this responsive design thing I’ve heard so much about. Nothing too fancy, just narrowing or removing the width of the left sidebar for smaller screens, plus taking out some stylistic frills (e.g.: rounded corners) for mobile browsers.

So there you have it! This redesign consumed so much of my free time for months, but now I can finally relax a bit…

VGVA.com redesign: the backend

The first and most obvious aspect of this redesign was moving from a few homebrewed PHP scripts to a proper CMS, namely WordPress. The advantages are obvious—revision history, a full text editor, taxonomies, etc… etc…—are obvious. But I needed a lot more than just a basic CMS for this site, and WordPress was ready:

The first and most obvious aspect of this redesign was moving from a few homebrewed PHP scripts to a proper CMS, namely WordPress. The advantages—revision history, a full text editor, taxonomies, etc… etc…—are obvious. But I needed a lot more than just a basic CMS for this site, and WordPress was ready:

Multiple custom post types

I’ve got 2 now, and will be implementing a third in the near future. News display on the front page and the left sidebar, and require not just a start date but an expiry date. Newsletters have no custom fields but are mailed out to our membership upon publication. Last comes Skills, a series of tutorials sent out every couple of weeks by one of the mentors to the intermediate players. Right now they’re only implemented as static pages with hard-coded dates—bit of a rush job, I admit.

Control panel

Some pages, such as tournaments and registration pages, have time-sensitive content. Previously I kept the different versions of these pages in separate files, swapping them out via crontabs. This worked well enough, but it was definitely not friendly to non-techy people. My solution was to keep different versions in separate private sub-pages (tidier that way), with the master (public) page’s content consisting only of a banner and a shortcode.

This shortcode would output the content of one of the sub-pages, based on the current time and whatever deadlines apply.

add_shortcode( 'vgva_summerfling_body', 'vgva_summerfling_body_func' );

function vgva_summerfling_body_func($atts) {
  $now = time();
  $fling_over = get_option('vgva_fling_date') + 86400; //the day after it ends
  if($now < $fling_over) {
    if(($now >= get_option('vgva_fling_upcoming') && $now < get_option('vgva_fling_reg_open')) || get_option('vgva_fling_upcoming') > get_option('vgva_fling_reg_open')) {
      //summer fling upcoming
      $pageId = 788;
    } else {
      //summer fling registration open
      $pageId = 790;
    }
  } else {
    //summer fling inactive/over
    $pageId = 786;
  }
  $page = get_page($pageId);
  return apply_filters('the_content', $page->post_content);
}

How are these deadlines set? Through a “control panel” consisting of several pages, each setting one aspect of the site’s configuration. Registration, board members, tournaments, etc… Basically, if it influences the site’s behaviour, or appears on more than one place on the site, it goes in the control panel.
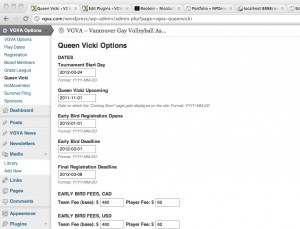
So, non-techy people can easily update the pages and the configuration. The logic tying everything together is still my domain, but once I’ve ironed out all the bugs that’ll never needs to change unless new features are required.

Speaking of shortcodes, the sub-pages (and hell, almost every page on the site) makes generous use of them. It was a pain to set up, but now I can sit back and relax. No more global search-and-replace to update board membership and contact info (the chair’s name and email, especially, shows up on many different pages.)

add_shortcode( 'vgva_fling_reg_fee', 'vgva_fling_reg_fee_func' );

function vgva_fling_reg_fee_func($atts) {
  setlocale(LC_MONETARY, 'en_US');
  return money_format('%n',get_option('vgva_fling_fee'));
}

One pet peeve I have is that, unlike Drupal, WordPress does not have built-in logic to generate the markup for configuration pages, so not only do I have to do the hard work, there’s no accepted standard. Hmph. Oh well.

The Matchmaker

The matchmaker logic didn’t change a whole lot: I tweaked the data structure here and there, but nothing substantial. The real pain was making custom forms work in WordPress, with the custom templates that feel very… hacky and awkward. Again, Drupal is way easier for heavy custom development. But hey, I knew what I was getting into.

One last thing: all this custom logic (custom post types, matchmaker) was implemented as plugins, not part of the active theme. It’s just common sense, right?

So there you have it, a peek into the back-end development of VGVA.com. It was by far my most involved project, and I enjoyed every minute of it. I learned so much about WordPress’s guts, and got some excellent hands-on experience.

(Next up: a bit about the redesigned front-end)

The VGVA.com redesign

For several months, I’ve been hard at work redesigning the Vancouver Gay Volleyball Association website. Longtime readers will remember previous posts wherein I expressed my insecurities, then my excitement at tackling its redesign in 2008. Now in 2011 comes another redesign, even more extensive.

For several months, I’ve been hard at work redesigning the Vancouver Gay Volleyball Association website. Longtime readers will remember previous posts wherein I expressed my insecurities, then my excitement at tackling its redesign in 2008.

Now in 2011 comes another redesign, even more extensive. I moved the site to WordPress instead of homebrewed PHP scripts, jiggered the layout and structure, and made extensive under-the-hood changes to allow non-techy people to update content, announcements, and time-sensitive information (tournaments, registration) without mucking about with HTML and SQL.

In the next couple of posts I’ll go into more detail about the changes I’ve made, and what I’ve learned along the way.

Content type descriptions in node/add

Most of my Drupal experience in the last year has been either purely back-end development, or superficial front-end stuff: JavaScript, AJAX, tweaking templates and styles, that sort of thing. But in the last couple of weeks, in two different projects, I’ve been digging more into theme development, menu management, and various other issues.

Most of my Drupal experience in the last year has been either purely back-end development, or superficial front-end stuff: JavaScript, AJAX, tweaking templates and styles, that sort of thing. But in the last couple of weeks, in two different small-scale projects, I’ve been digging more into theme development, menu management, and various other issues site admin issues. It’s fascinating stuff, though hard to wrap my head around. Plain old development on the Drupal platform was a lot more straightforward, at least to me. Still, it’s good to get out of my comfort zone, right?

Here’s one particular problem I dealt with, which I had a hell of a time googling for: the client wanted to change the content type descriptions on the “Add Content” (/node/add). It took me some trial and error and googling to find out that’s taken from two places:

  1. The content type description, as set in each Content Type.
  2. Overriding that if they exist, the descriptions of the “Add Content” menu item’s children.

There are still a lot of things I’m figuring out, like how to change the text on top of the Add Content page. Seems a simple thing, right? Maybe it is if you know how, but I don’t. It’s definitely not the menu system, though interestingly the menu item description does display as expected on its parent menu page…

How to disable individual fields in the node edit screen

Consider this problem: you want to disable a few fields on the node edit screen for particular node types. Let’s say the body, although this could apply to any and all fields. The reason for this is that for our client’s e-commerce system, the products are synched from an external POS system, and most fields should not be touched AT ALL… and certainly shouldn’t be overwritten with content copy-pasted from MS Word, which has happened a few times and prompted us to take preventative measures.

Consider this problem: you want to disable a few fields on the node edit screen for particular node types. Let’s say the body, although this could apply to any and all fields. The reason for this is that for our client’s e-commerce system, the products are synched from an external POS system, and most fields should not be touched AT ALL… and certainly shouldn’t be overwritten with content copy-pasted from MS Word, which has happened a few times and prompted us to take preventative measures.

I should clarify that at least one field (images) does still need to be editable, which is why we’re not just taking away edit permissions altogether.

Okay, so I’m not saying what follows is the best solution, just what I came up with, inspired by a Stack Overflow thread I can’t seem to find right now. It uses hook_form_alter() to (a) hide the body edit field group, and (b) replace it with static markup displaying the body content. I thought about replacing it with a disabled textarea, but in Firefox, for instance that’ll show up with a medium grey background that really doesn’t look very good.

$CONTENT_TYPE = 'product'; 
function MODULE_form_alter(&$form, $form_state, $form_id) {
  if(isset($form['#node']) && $form_id == $CONTENT_TYPE . '_node_form') {
    $form['displaybody'] = array(
      '#value' => '' . $form['body_field']['body']['#title'] . ':
' . $form['body_field']['body']['#default_value'] . '
', '#weight' => $form['body_field']['#weight'], ); $form['body_field']['#access'] = FALSE; } }

A few notes:

Line 3: I’m not really sure what the first condition is for. At first I thought it was to cover only editing existing nodes, but that doesn’t appear to be the case. The second condition is to cover only certain node types

Lines 4–10: we insert a new form element, ‘display body’. It will show the body field label and content, and will be have the same weight as the existing body field, so it shows up in the same position on the screen.

Line 11: This hides the body field, unconditionally.

But what if we wanted to allow some users to edit that field? That’s certainly doable, but it gets a bit awkward. I could use hook_perm() to create a special permission—call it ‘edit body’—and replace line 3 above with:

if(isset($form['#node']) && $form_id == $CONTENT_TYPE . '_node_form' && !user_access('edit body')) {

However, that permission would show up in my own module’s section, not with the other uc_product permissions, so that’s a bit annoying. I could hack uc_product.module, but that’s not really a good solution. If there were a way to add to a third party module’s permissions, that would be very awesome!

Drupal and hook_form_alter()

I’ve been working with Drupal a lot in the last few months, and enjoying the hell out of it. Every day I’m learning some new tidbit, some interesting new scheme that at first seems confusing, but them usually makes me go, “Wow, that’s brilliant!”

I’ve been working with Drupal a lot in the last few months, and enjoying the hell out of it. Every day I’m learning some new tidbit, some interesting new scheme that at first seems confusing, but them usually makes me go, “Wow, that’s brilliant!”

Forms, for instance. Drupal offers a nice API to build and process forms; hook_form_alter() lets your modules modify forms defined in other modules, by adding fields, removing fields, even changing the back-end logic. At first I thought all this hook could do was fields, and I looked for something like hook_form_validate_alter(). But no, the real solution is even more elegant:

mymodule_form_alter(&$form, $form_state, $form_id) {
  if($form_id == 'form_whatever') {
    $form['#validate'][] = 'mymodule_form_validation';
  }
}

The $form['#validate'] looks like it contains an array of functions to be called when validating the form (likewise for $form['#submit'], I think). Simple and beautiful. The best part is, nothing is overwritten. Any module may alter any given form, and all their functions will be run. (The order in which they’re run can also be set: turns out modules have weight). I’ve thought for a while that Drupal seems ridiculously over-engineered, but that’s its strength: it allows developers to try out all sorts of crazy schemes like this. The more I learn about Drupal, the more I respect it.